This is the tool used by the Azure Developer Support Team. You can install it while on a VM using Powershell by running the following in a Powershell command window:
I recently performed am IISRESET on some production Azure cloud servers and found to my horror that the website died. A restart resolved the issue, but I had just discovered a little too late that IISRESET is not an option on a Cloud Services server.
I came across a great blog outlining all the steps to setting up alternative URLs for Team Foundation Server 2010 (TFS), Team Web Access and the Reporting server too.
Here’s a quick way to manually test your SMTP service.
The best plan is to run this test on the server first (ensure that localhost or 127.0.0.1 is allowed to access the service) and then from a remote client next.
Follow these steps
(the response examples are those returned against a Windows 2008 R2 Server SMTP Service):
Type Telnet <server name or IP> 25 at a command prompt, and then press ENTER.
The output should look something like: 220 CP5-15164 Microsoft ESMTP MAIL Service, Version: 7.5.7600.16601 ready at Fr i, 16 Sep 2011 11:23:30 +0100
Type ehlo, and then press ENTER.
The output resembles the following: 250-CP5-15164 Hello [127.0.0.1] 250-TURN 250-SIZE 2097152 250-ETRN 250-PIPELINING 250-DSN 250-ENHANCEDSTATUSCODES 250-8bitmime 250-BINARYMIME 250-CHUNKING 250-VRFY 250 OK
Type mail from:email@domain.com, and then press ENTER.
The output resembles the following: 250 2.1.0 email@domain.com….Sender OK
Type rcpt to:youremail@domain.com, and then press ENTER.
The output resembles the following: 250 2.1.5 youremail@domain.com
Type Data, and then press ENTER.
The output resembles the following: 354 Start mail input; end with <CRLF>.<CRLF>
Type Subject:Test # subject, and then press ENTER two times.
Type Test # body, and then press ENTER.
Press ENTER, type a period (.), and then press ENTER.
The output resembles the following: 250 2.6.0 <CP5-151641XvpFVjCRG00000007@CP5-15164> Queued mail for delivery
Type quit, and then press ENTER.
The output resembles the following: 221 2.0.0 CP5-15164 Service closing transmission channel
If you are experiencing very slow or ‘jittery’ network performance when attempting to connect to them using remote desktop or file shares, then it may well be down to a couple of settings on your adaptors.
I had this experience on two types of network cards. A Marvell Yukon 88E8056 and a Realtek RTL8187. After much head bashing I found various bits of info about the network adaptor settings and made the following changes.
On the Host Hyper-V Server
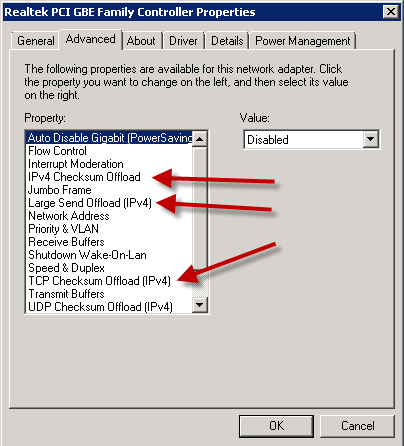
On all network adaptor configuration I disabled the following
IPv4 Checksum Offload
Large Send Offload (IPv4)
TCP Checksum Offload (IPv4)
This seemed to do most of the work, but just to be sure I also tackled the guests.
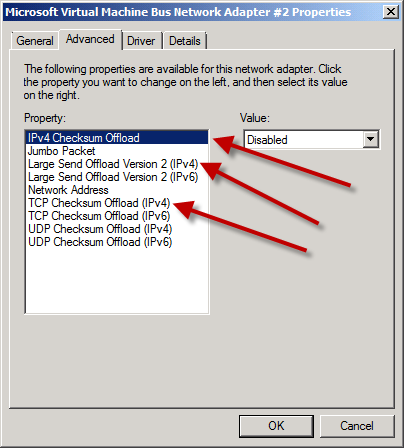
On the Guest VMs
On all network adapter configuration I disabled the following
IPv4 Checksum Offload
Large Send Offload Version 2(IPv4)
TCP Checksum Offload (IPv4)
If these don’t work for you then I have also heard of success switching to the legacy network adaptor in the guest VM. Also ensure that your flow control is enabled on your host NICs.
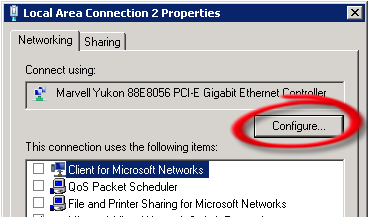
Adaptor configuration
To get to the adaptor settings open the ‘Network and Sharing Center’, click on ‘Change adaptor settings’, then right-click on the adaptor and select properties. Now click the ‘Configure’ button.
I have just discovered that Windows Server Backup on Windows server 2008 R2 is incapable of backing up any volume 2TB or over. This, it turns out, is due to a VHD file limit. Backup essentially creates a VHD for each volume in the backup, which is great for recovery, but causes this annoying problem.
The not very helpful message you will receive if you try a full server backup when one of the volumes is too large is
“Volumes larger than 2088958 megabytes cannot be protected.”
The work-around is to not do full volume backups, but make your selection of folders. Choose ‘Custom’ backup configuration and then just select all the folders on the volume that is too large.