Category: Windows 7

Keeping your managed PC from locking all the time

I know you shouldn’t try and subvert your companies internal security policies, but sometimes the security department just don’t seem to understand the consequences of what they do…especially when using multiple computers simultaneously!

The following script essentially presses the inaccessible F15 key at regular time intervals to ensure the screen timeout is reset and you avoid locking out.

Continue reading “Keeping your managed PC from locking all the time”

Best app for analysing and visualising space usage on your hard drives. WinDirStat

I have been using this app for years and it’s still the best one out there.

WinDirStat (https://windirstat.info/) is a brilliant application that trawls through you files on a disk analysing their files types, location and size.


When it finishes analysing (which it does remarkably quickly, but may take a few minutes) you get presented with a great looking ‘TreeMap’. Select a folder or file type shown in the lists and the associated part of the map is highlighted. This gives you a very quick feel for what’s taking up all that space.


Create a No Hyper-V boot option

There seem to be a number of scenarios where Hyper-V (and it’s many virtual networks and network adapters) can cause problems. My two are running VMware and problems with the Azure emulator with shared cache when debugging in Visual Studio.

To solve this problem you could uninstall the Hyper-V feature, but it’s still important for so many other tasks that this is a real pain.

It is possible to create a simple boot option for Windows 7 and 8 and Windows Server that disables the hypervisor. This is quick and painless, so when you ever need or don’t need Hyper-V, just reboot and select the option you want.

  1. Open a command prompt as Administrator (right-click the start button on the desktop and select ‘Command Prompt (Admin)’
  2. Type
     bcdedit /copy {current} /d "Microsoft Windows 8 - No Hypervisor"

    and press enter.
    This creates a new boot entry identical the the current one.

  3. Type
     bcdedit

    and press enter to list all the boot entries.

  4. Copy the identifier, including curly brackets, for the new boot entry (should be the last in the list)
  5. Now we need to disable the hypervisor on the new entry. Type
     bcdedit /set {the new identifier} hypervisorlaunchtype off

    and press enter.

  6. Now reboot and you will be presented with a nice boot menu option and can choose to boot with or without Hyper-V

Making your My Documents folder sync with the New SkyDrive app

Microsoft have in their wisdom now decided to scrap Live Mesh (after scrapping Mesh and then Live Sync previously) and let hope settle on SkyDrive as the method for synchronising files and folders between devices.

You can get the new SkyDrive app from http://windows.microsoft.com/en-US/skydrive/download-skydrive

Unfortunately, this version of the application does not allow the synching of folders from any location. It will only synchronise data that is in a predefined location!

When you install SkyDrive you get a chance to select a location of the SkyDrive folder. If you choose the default it will create it in your profile folder. If you miss this, as I did, you need to do the following:

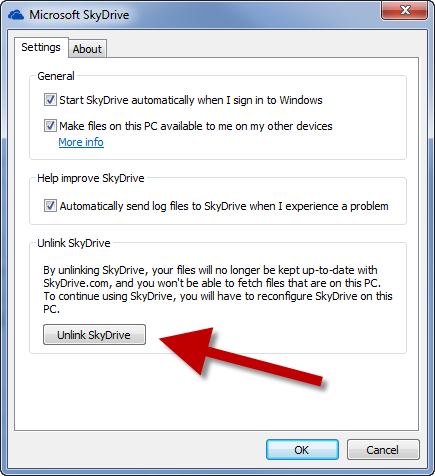
  1. Right-click on the SkyDrive otification icon in the bottom right and select Settings
  2. Then ‘Unlink’
  3. …and now re-link the SkyDrive and this time choose the preferred location for the folder.

Normally to get files and folders to sync you are expected to move them to this new folder. Frankly that’s just irritating, as you may have established a nice folder structure by now in you My Documents folder already.

So I decided to go the full hog and purchased 50GB of SkyDrive space for £16 per year and then proceeded with the following steps to move the entire My Documents folder to SkyDrive.

  1. Created a folder in the SkyDrive folder called Documents
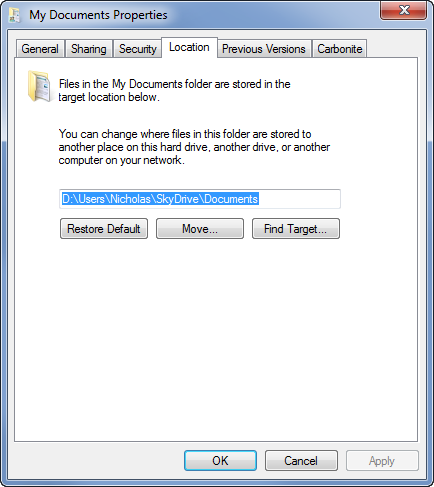
  2. Right-click on My Documents and select Properties
  3. Then select the ‘Location’ tab
  4. Click move and now select the new SkyDrive\Documents folder you just created.
  5. You will be prompted to move all your files. I suggest you select yes.
    (Watch out for folder and file path names that are too long. I had to move some stuff out of ‘My Documents’ for this to complete. Mainly because Visual Studio projects are deeply nested and can have huge names for files and folders.)
  6. When that completes you now have an actively synched ‘My Documents’ folder. You can follow this procedure for the other ‘My’ folders too, if you have space.

Delete and clear space taken up by Offline files in Windows 7

It took me a while to find this out, so to help others I have given the steps here. This will delete any locally cached off-line files from the mapping or computer that you set off-line files on.

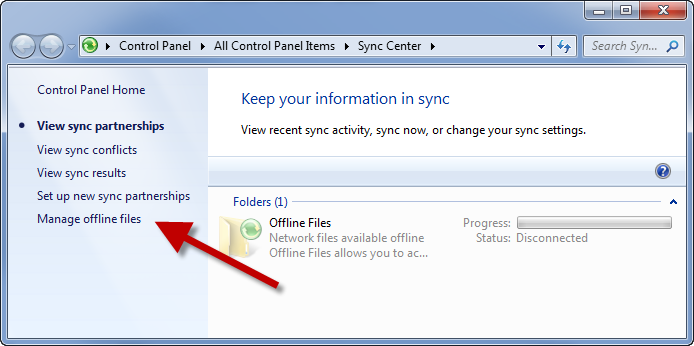
  1. Either open the ‘Sync Center’ and click on ‘Manage offline files’ or just type ‘offline’ in the start menu and select ‘Manage offline files’.
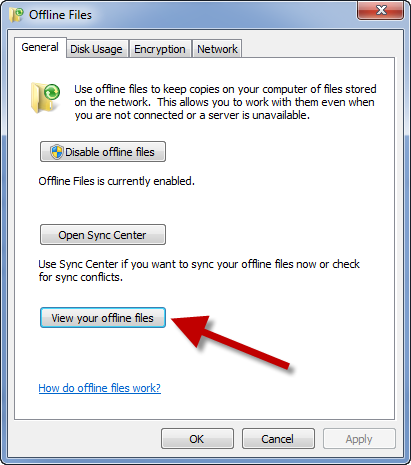
  2. Then in the ‘General’ tab of the ‘Offline Files’ window, click on ‘View your offline files’
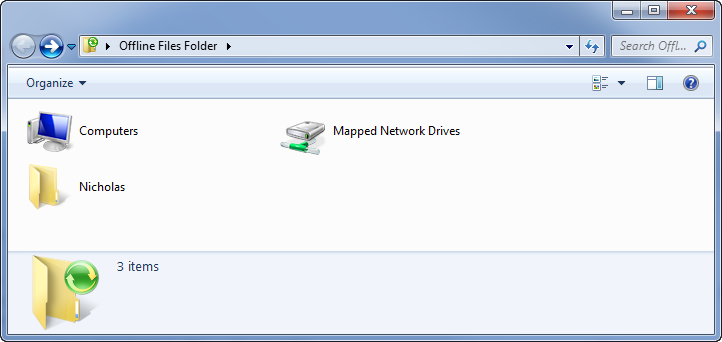
  3. You will now see an explorer window at the ‘Offline Files Folder’ level.
  4. Now you need to drill down to the specific mapped network drive or network computer you are caching local content from. In the next example I want to clear out a mapped drive, so I double-click on ‘Mapped Network Drives’
  5. You can see any mapped drives with off-line content. Right-click on the drive and select ‘Delete Offline Copy’

How to fix Adobe PDF preview in 64 bit Windows

This will fix previews in both Outlook and Windows explorer on Windows 7 64 bit machines.

If you get

This file cannot be previewed because of an error with the following previewer: PDF Preview Handler for Vista

in outlook when trying to preview PDF’s or just get no previews of PDF’s in explorer..

..then try the following.

Caution: Changing the registry should be done with great care…so make a backup of any changes!

  1. Start the Registry editor by using Start->Run (or Windows Key + R) and type regedit and click OK
  2. Expanding the tree to locate
    HKEY_LOCAL_MACHINE\SOFTWARE\Wow6432Node\Classes\CLSID\{DC6EFB56-9CFA-464D-8880-44885D7DC193} and select it.
  3. Now to make a backup of the previous settings just in case this does not work for you, right-click on the branch in the left pane and select export. Choose a location you can find again later (just in case! Although you should do this for any registry changes too.). You only need to export the selected branch. Windows 7 automatically takes full registry snapshot in case of major problems.
  4. Now on the right hand side double-click to edit the AppID value and change it to {534A1E02-D58F-44f0-B58B-36CBED287C7C}.
  5. I preview started working immediately even without restarting outlook! However you may need to restart?

Now, I can’t take credit for this brilliant solution. I found it at http://bink.nu/news/fix-adobe-pdf-preview-handler-on-64-bit-windows.aspx and only write it again here to make it easier to find for all! Why adobe don’t fix this I am not sure!