Category: Windows 8

Shutdown or Restarting Windows 8 in a Remote Desktop Session

In a remote session the normal shutdown button only allows you to disconnect or log off. After a bit of research I found 2 easy ways of restarting a remote desktop session.

  1. Go to the Desktop
  2. Close all open desktop apps
  3. Type ALT+F4 (this is the shortcut for closing apps and programs too)
  4. Up pop a new ‘Shut Down Windows” Windows 8 dialogue
  5. Then select the command of you desire.

If you are commend line oriented then,

  1. Type Windows logo key+ R to open the ‘Run’ dialog
  2. Type either ‘shutdown /r’ for a restart or ‘shutdown /s’ for a simple shutdown and click OK.
  3. If you want to see a UI or do this remotely, you can always try ‘shutdown /i’ on your local machine and do a remote shutdown.

Handy Windows 8 and 8.1 Shortcut Keys

Shortcut Keys

Here are few handy Windows Key shortcut keys I find useful

Windows logo key+ D Go to desktop
Windows logo key+ W Search settings only
Windows logo key+ F Search files only
Windows logo key+ C Show the ‘charms’ menu (the one on the right)
Windows logo key+ Tab Switch between recently used apps and programs (left apps bar)
Windows logo key+ L Lock the screen
Windows logo key+ E Opens windows explorer
Windows logo key+ R Open the Run dialog
Windows logo key+ S Opens the Search everywhere. Also do this by pressing the Windows key and just start typing
Windows logo key+ X This opens the ‘Quick Link’ menu. Very useful for the power users out there.
Windows logo key+ SHIFT + (left or right arrow) Move an app or window from one monitor to the other if you have multiple monitor.

For a full list of Windows 8 shortcuts see http://windows.microsoft.com/en-gb/windows-8/keyboard-shortcuts

TimeSpan to String Converter for XAML binding

Need to convert a TimeSpan to a sensible string for you Windows Phone or Windows Store App. With a little Bing help I created this converter. I hope you find it useful.


public class TimeSpanToStringConverter : IValueConverter
{
    public object Convert(object value, Type targetType, object parameter, string language)
    {
        TimeSpan span = (TimeSpan)value;
        if (span == TimeSpan.MinValue)
        {
            return "0 seconds";
        }
        string formatted = string.Format("{0}{1}{2}{3}",
            span.Duration().Days > 0 ? string.Format("{0:0} day{1}, ", span.Days, span.Days == 1 ? String.Empty : "s") : string.Empty,
            span.Duration().Hours > 0 ? string.Format("{0:0} hour{1}, ", span.Hours, span.Hours == 1 ? String.Empty : "s") : string.Empty,
            span.Duration().Minutes > 0 ? string.Format("{0:0} minute{1}, ", span.Minutes, span.Minutes == 1 ? String.Empty : "s") : string.Empty,
            span.Duration().Seconds > 0 ? string.Format("{0:0} second{1}", span.Seconds, span.Seconds == 1 ? String.Empty : "s") : string.Empty);
        if (formatted.EndsWith(", ")) formatted = formatted.Substring(0, formatted.Length - 2);
        if (string.IsNullOrEmpty(formatted)) formatted = "0 seconds";
            return formatted;
    }
        
    public object ConvertBack(object value, Type targetType, object parameter, string language)
    {
        string strValue = value as string;
        TimeSpan resultSpan;
        if (TimeSpan.TryParse(strValue, out resultSpan))
        {
            return resultSpan;
        }
        throw new Exception("Unable to convert string to date time");
    }
 }

Making your My Documents folder sync with the New SkyDrive app

Microsoft have in their wisdom now decided to scrap Live Mesh (after scrapping Mesh and then Live Sync previously) and let hope settle on SkyDrive as the method for synchronising files and folders between devices.

You can get the new SkyDrive app from http://windows.microsoft.com/en-US/skydrive/download-skydrive

Unfortunately, this version of the application does not allow the synching of folders from any location. It will only synchronise data that is in a predefined location!

When you install SkyDrive you get a chance to select a location of the SkyDrive folder. If you choose the default it will create it in your profile folder. If you miss this, as I did, you need to do the following:

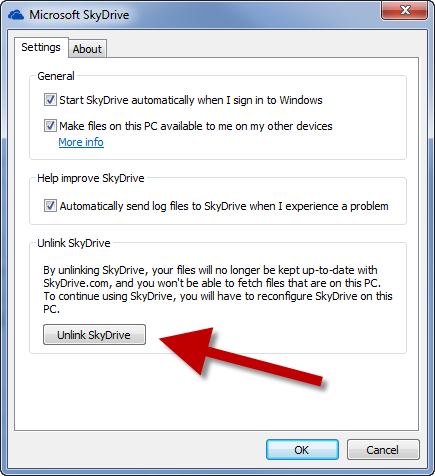
  1. Right-click on the SkyDrive otification icon in the bottom right and select Settings
  2. Then ‘Unlink’
  3. …and now re-link the SkyDrive and this time choose the preferred location for the folder.

Normally to get files and folders to sync you are expected to move them to this new folder. Frankly that’s just irritating, as you may have established a nice folder structure by now in you My Documents folder already.

So I decided to go the full hog and purchased 50GB of SkyDrive space for £16 per year and then proceeded with the following steps to move the entire My Documents folder to SkyDrive.

  1. Created a folder in the SkyDrive folder called Documents
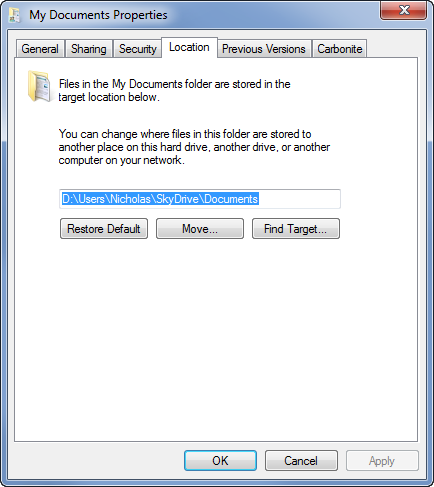
  2. Right-click on My Documents and select Properties
  3. Then select the ‘Location’ tab
  4. Click move and now select the new SkyDrive\Documents folder you just created.
  5. You will be prompted to move all your files. I suggest you select yes.
    (Watch out for folder and file path names that are too long. I had to move some stuff out of ‘My Documents’ for this to complete. Mainly because Visual Studio projects are deeply nested and can have huge names for files and folders.)
  6. When that completes you now have an actively synched ‘My Documents’ folder. You can follow this procedure for the other ‘My’ folders too, if you have space.

Virtual PC on Windows 8–Use Hyper-V instead

Windows 8 does not support Virtual PC and probably never will. However, even better is that Windows 8 now includes Hyper-V as a ‘feature’.

You can install this easily by turning it on.

  1. Just search  Settings for the word ‘feature’ and you should find, ‘Turn Features on or off’.
  2. Then click Hyper-V to include all sub-features.
  3. You will then need to restart.
  4. After restart, you will see

    on your desktop. Or just type ‘Hyper’ and it will come up in the app search.
  5. Hyper-V works a bit differently from Virtual PC or Virtual Server, so find out about it online.
  6. However to save you a bit of grief I would suggest that one of the first things you do is setup the networking, otherwise any new machine you create will not be able to be allocated a network connection.
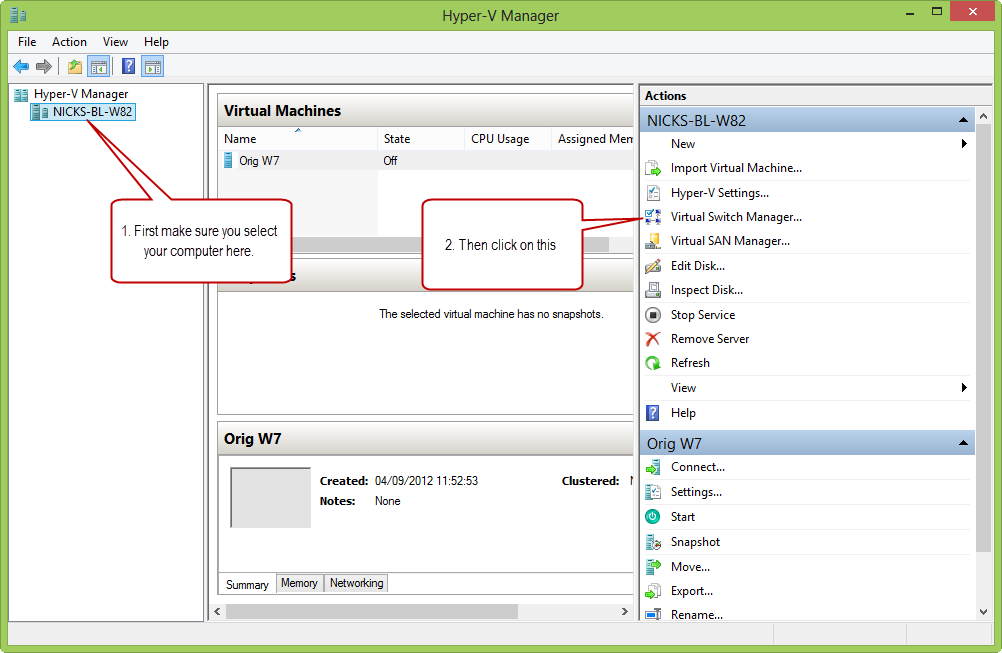
  7. To set up the network, first ensure you have selected your PC on the left and then click on ‘Virtual Switch Manager’
  8. You can create a variety of switches that have different access profiles. For your machines to be able to share your network connection and gain access to the internet, you need to create a new ‘external’ switch, by clicking on ‘Create Virtual Switch’, with ‘External’ selected in the list.
  9. Give the virtual switch a name. You need to select which network device in you host machine you would like the switch to use and how. So I like to put this in the network name. Also if you have more than one network device then you can allocate one to all the guest machines and the other to the host. In the example below, I have decided to use my wired connection and have that shared with the host.
  10. Now when you create new guest virtual machines, you will be able to select a network for them to join from the start.