Author: nrogoff

Making your My Documents folder sync with the New SkyDrive app

Microsoft have in their wisdom now decided to scrap Live Mesh (after scrapping Mesh and then Live Sync previously) and let hope settle on SkyDrive as the method for synchronising files and folders between devices.

You can get the new SkyDrive app from http://windows.microsoft.com/en-US/skydrive/download-skydrive

Unfortunately, this version of the application does not allow the synching of folders from any location. It will only synchronise data that is in a predefined location!

When you install SkyDrive you get a chance to select a location of the SkyDrive folder. If you choose the default it will create it in your profile folder. If you miss this, as I did, you need to do the following:

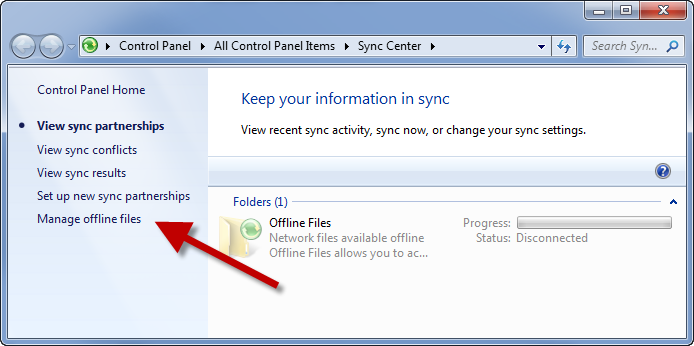
  1. Right-click on the SkyDrive otification icon in the bottom right and select Settings
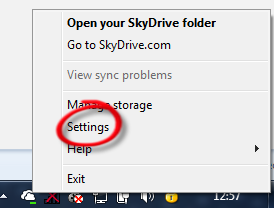
  2. Then ‘Unlink’
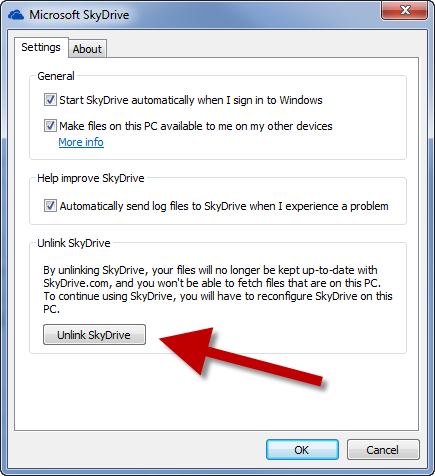
  3. …and now re-link the SkyDrive and this time choose the preferred location for the folder.

Normally to get files and folders to sync you are expected to move them to this new folder. Frankly that’s just irritating, as you may have established a nice folder structure by now in you My Documents folder already.

So I decided to go the full hog and purchased 50GB of SkyDrive space for £16 per year and then proceeded with the following steps to move the entire My Documents folder to SkyDrive.

  1. Created a folder in the SkyDrive folder called Documents
  2. Right-click on My Documents and select Properties
  3. Then select the ‘Location’ tab
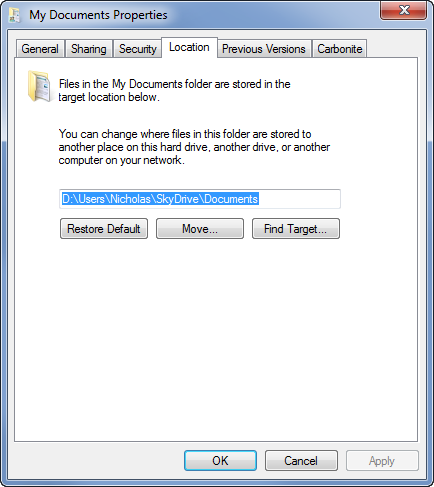
  4. Click move and now select the new SkyDrive\Documents folder you just created.
  5. You will be prompted to move all your files. I suggest you select yes.
    (Watch out for folder and file path names that are too long. I had to move some stuff out of ‘My Documents’ for this to complete. Mainly because Visual Studio projects are deeply nested and can have huge names for files and folders.)
  6. When that completes you now have an actively synched ‘My Documents’ folder. You can follow this procedure for the other ‘My’ folders too, if you have space.

Virtual PC on Windows 8–Use Hyper-V instead

Windows 8 does not support Virtual PC and probably never will. However, even better is that Windows 8 now includes Hyper-V as a ‘feature’.

You can install this easily by turning it on.

  1. Just search  Settings for the word ‘feature’ and you should find, ‘Turn Features on or off’.
  2. Then click Hyper-V to include all sub-features.
  3. You will then need to restart.
  4. After restart, you will see

    on your desktop. Or just type ‘Hyper’ and it will come up in the app search.
  5. Hyper-V works a bit differently from Virtual PC or Virtual Server, so find out about it online.
  6. However to save you a bit of grief I would suggest that one of the first things you do is setup the networking, otherwise any new machine you create will not be able to be allocated a network connection.
  7. To set up the network, first ensure you have selected your PC on the left and then click on ‘Virtual Switch Manager’
  8. You can create a variety of switches that have different access profiles. For your machines to be able to share your network connection and gain access to the internet, you need to create a new ‘external’ switch, by clicking on ‘Create Virtual Switch’, with ‘External’ selected in the list.
  9. Give the virtual switch a name. You need to select which network device in you host machine you would like the switch to use and how. So I like to put this in the network name. Also if you have more than one network device then you can allocate one to all the guest machines and the other to the host. In the example below, I have decided to use my wired connection and have that shared with the host.
  10. Now when you create new guest virtual machines, you will be able to select a network for them to join from the start.

VC_RED.cab, VC_RED.MSI, install.res.1028.dll etc.. Can be removed!

If you are wondering how or what all these funny files (more listed below) are sitting on your c:\ or other drive, then you will be please to know that they were generated as temporary files by a Visual C++ redistributable install package. Unfortunately the package does not clean them up afterwards.

If they are not on your c:\ drive, that because the installer actually looks for the drive with the most available space or something like that!

Any of the following files can be safely removed.

install.exe
install.res.1028.dll
install.res.1031.dll
install.res.1033.dll
install.res.1036.dll
install.res.1040.dll
install.res.1041.dll
install.res.1042.dll
install.res.2052.dll
install.res.3082.dll
vcredist.bmp
globdata.ini
install.ini
eula.1028.txt
eula.1031.txt
eula.1033.txt
eula.1036.txt
eula.1040.txt
eula.1041.txt
eula.1042.txt
eula.2052.txt
eula.3082.txt
VC_RED.MSI
VC_RED.cab

For Microsoft’s article see http://support.microsoft.com/kb/950683

Delete and clear space taken up by Offline files in Windows 7

It took me a while to find this out, so to help others I have given the steps here. This will delete any locally cached off-line files from the mapping or computer that you set off-line files on.

  1. Either open the ‘Sync Center’ and click on ‘Manage offline files’ or just type ‘offline’ in the start menu and select ‘Manage offline files’.
  2. Then in the ‘General’ tab of the ‘Offline Files’ window, click on ‘View your offline files’
  3. You will now see an explorer window at the ‘Offline Files Folder’ level.
  4. Now you need to drill down to the specific mapped network drive or network computer you are caching local content from. In the next example I want to clear out a mapped drive, so I double-click on ‘Mapped Network Drives’
  5. You can see any mapped drives with off-line content. Right-click on the drive and select ‘Delete Offline Copy’

Getting IE to remember your login again, when you previously said don’t!

It’s very frustrating that IE will never prompt you again for saving details to a website once you have said ‘No’ in this prompt (in IE 9 it’s a bar along the bottom on the window!)


The easiest, but most destruction method of fixing this is to wipe all you form data using the options in IE.

However, I have found two good blogs that explain why and how to fix it without loosing all your other login details etc..

Firstly , a manual registry fix is explained here at watchingthenet.com. Using the registry editor you can do a three stage process to fix just the one website you have the problem with.

Secondly, there is this one by Eric Law that explains why it’s a bit tricky to resolve due to the secure storing of the form data and settings. Most importantly is that he has very kindly made a little utility that help you fix it for just one website at a time.

You need to put in the actual page address, not the domain. Best to go to the offending login page that is refusing to remember and copy the address directly.

How to update all fields and Table of Contents in Word 2010, including headers and footers!

  1. Click on the ‘File’ tab then ‘Options’
  2. Select ‘Display’ on the left column, and make sure that ‘Update fields before printing’ is ticked.
  3. Click OK to save this setting. You only need to do this once and all documents will update field every time you print.
  4. So now to force an update of all fields, all you need to do is do a print preview and all is updated.
  5. I prefer to have ‘Print Preview’ available on the ‘Quick Access Toolbar’. If yours is not there then just click on the down arrow and select it from the list.

Tip – Manually update a single field:

To update just one field, click your mouse into it and press the F9 key on your keyboard.

Tip 2 – Manually update all fields:

To update every field in your document (other than in headers and footer), press CTRL+A to select all, then click F9