Tag: Apps

Creating Splash or Launch images for Cross-platform apps with a Photoshop script

There are a bewildering number of screen sizes when publishing a cross platform app (See also Icons, Tiles, Splash screens and other images when publishing phone apps with Xamarin). Creating Splash or Launch screens for all these resolutions can be a real pain. This is what they look like to scale.
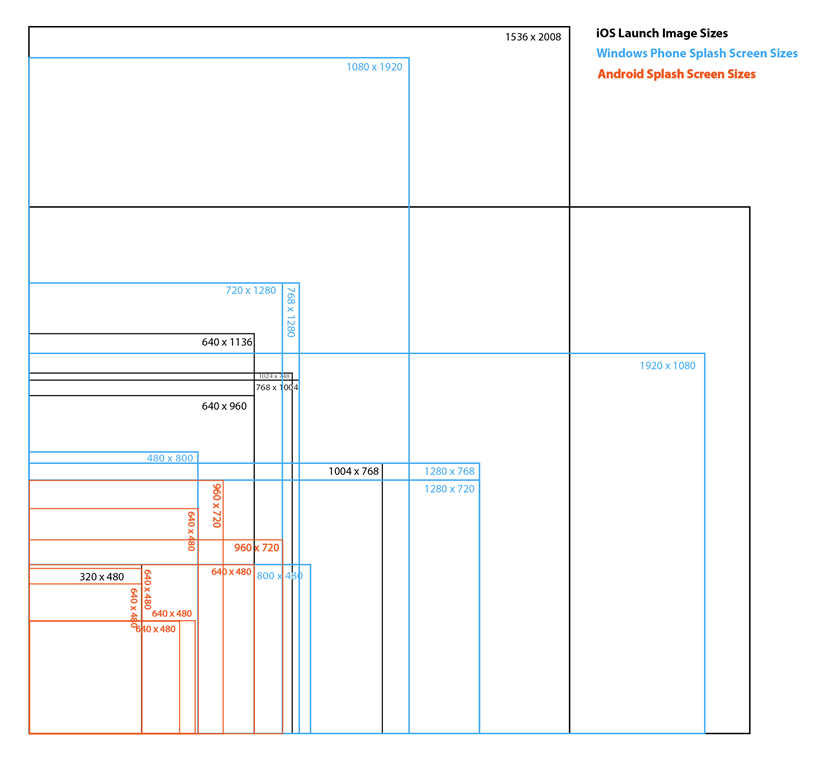
 

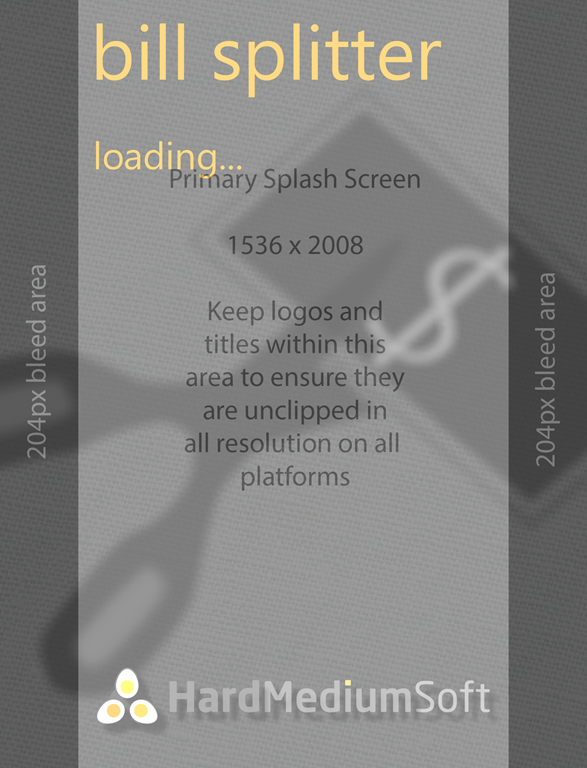
Rather than trying to create all these by hand I have created a Photoshop script to generate all the variations from a portrait source and a landscape source. You can download this from All Mobile Splash Screens.js The source images must be 1536 x 2008 for Portrait and conversely 2008 x 1536 for landscape. Due to variation in aspect ratios, If your splash screen has a logo or text of some sort it’s best to make sure this lies with a of 204px left and right padding area for portrait or top and bottom for landscape.
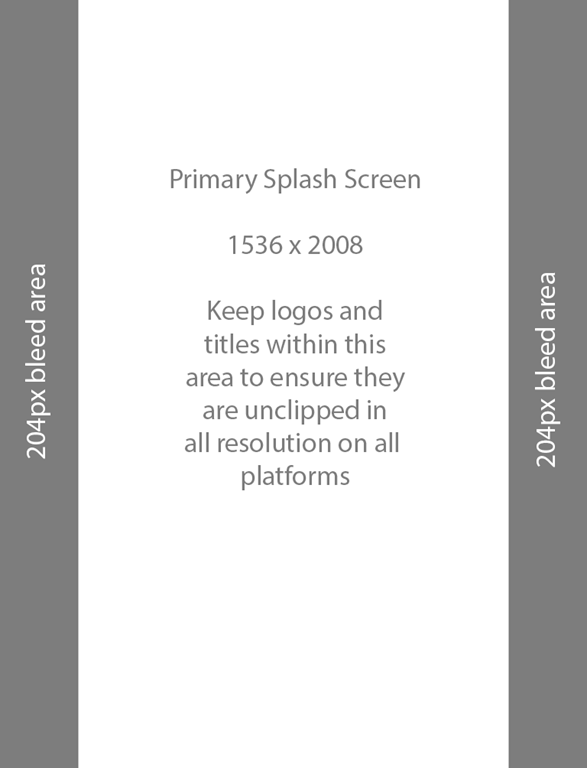
 

for example, you can see below all my ‘important’ stuff is inside the bleed area.
 

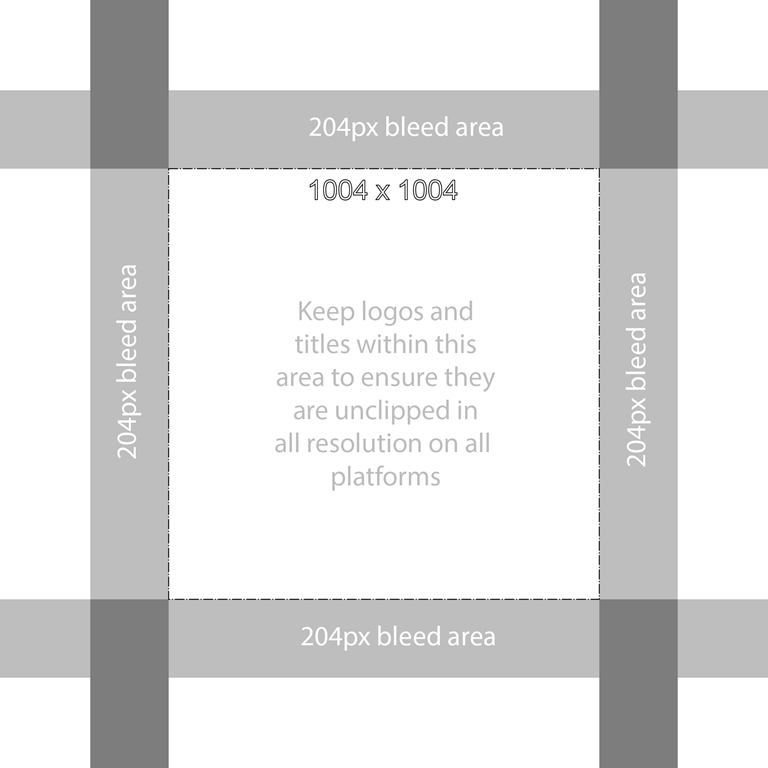
If you are really clever then you can start with a single image for both keeping the logo or text within a central box of 1004×1004 as shown here.
 

Use Photoshop Script

  1. Download the Photoshop script from here. The script is JavaScript, so you can open it in a text editor and have a look.
  2. Copy it to your Photoshop Presets/Scripts folder. Mine was at c:\Program Files\Adobe\Adobe Photoshop CC 2014\Presets\Scripts and I create a subfolder to hold my scripts. On a mac or if you have the 32-bit version your local path will vary.
  3. Launch Photoshop and you should now see the script available under File->Scripts called ‘HMS Create All Mobile Splash Screens’
  4. Open either your Portrait (must be 1536 x 2008) or Landscape (must be 2008 x 1536)  source image.
  5. Then run the script by selecting it from the menu.
  6. If you have a landscape just repeat the process for that.

This will generate a series of cropped and new resolution versions of your original image in the same folder. If the source image is not exactly the right size the script will tell you and exit. You should end up with something like the set below, where all the test is still in frame.


For information on all image sizes, including Icons, Tiles and the rest, when deploying cross-platform apps, have a look at my other blog article Icons, Tiles, Splash and other images when publishing phone apps with Xamarin

Here is the full code listing of the Photoshop script. If anyone does any improvements (and there’s lots of potential ;-)), I would love to hear about it.


// HMS Photoshop Script for creating several variations of the SplashScreen
// ------------------------------------------------------------------
// Created by: Nicholas Rogoff
// Last Updated: 2015-04-25
// Copyright Hard Medium Soft Ltd. 2015

var docRef;

function main(){
    var newWidth;
    var newHeight;
    var portraitDims = [
        [1536,2008],
        [768,1004],
        [640,960],
        [320,480],
        [768,1280],
        [480,800],
        [640,1136],
        [1080,1920],
        [720,1280],
        [720,960],
        [480,640],
        [320,470],
        [320,426]
        ];
        var landscapeDims = [
        [2048,1496],
        [1024,748],
        [1280,768],
        [800,400],
        [1920,1080],
        [1280,720],
        [960,720],
        [640,480],
        [470,320],
        [426,320]
        ];
     var newDims;
     
    //Set-up
    app.displayDialogs = DialogModes.NO;
    app.preferences.rulerUnits = Units.PIXELS;
    app.preferences.typeUnits = TypeUnits.PIXELS;

    //reference the doc
    if(app.documents.length != 0 && app.activeDocument != null){
        docRef = app.activeDocument;
    } else {
        app.beep();
        alert(":( The starting image must be 1536 x 2008 px. No image appears to be loaded. Script cancelled!");
        return;
    }

    //Get path
    var origPath = docRef.path;

    //Check resolution
    var origHeight = docRef.height.value;
    var origWidth = docRef.width.value;
    if((origWidth != 1536 && origHeight != 2008) && (origWidth != 2004 && origHeight != 1496)){
        app.beep();
        alert(":( The starting image must be 1536 x 2008 for Portrait or 2004 x 1496 for Landscape splash screens. The current image is " + origWidth + " x " + origHeight + " Script cancelled!");
        return;
    }

    //Select either Portrait or Landscape size ranges
    if(origWidth == 1536 && origHeight == 2008){
         newDims = portraitDims;
    } else {
        newDims = landscapeDims;
    }
    for(i = 0; i < newDims.length; i++){
         newResizeWidth = (newDims[i][1] / origHeight) * origWidth;

        //Resize
        docRef.resizeImage( newResizeWidth, newDims[i][1] );
    
        //Set Canvas
        docRef.resizeCanvas(newDims[i][0], newDims[i][1], AnchorPosition.MIDDLECENTER);

        //Save
        SaveDoc(newDims[i][0], newDims[i][1], origPath);

        //Revert
        Revert();
    }
    app.beep();
    alert("All Done ;-)");
}

//Save document
function SaveDoc (newWidth, newHeight, origPath){    
    var saveFile;
    saveFile = new File(origPath + "/SplashScreen-" + newWidth + "x" + newHeight + ".png");
    var saveOptions = new PNGSaveOptions;
    saveOptions.compression=0;
    docRef.saveAs(saveFile, saveOptions, true, Extension.LOWERCASE);
}

//Revert
function Revert(){
    //runMenuItem("Revert");
    var idRvrt = charIDToTypeID( "Rvrt" );
    executeAction( idRvrt, undefined, DialogModes.NO );
}

//Execute
main();
Icons, Tiles, Splash screens and other images when publishing phone apps with Xamarin

Publishing an app to one platform is difficult enough, publishing to 3 or 4 different ones can be very time consuming. One area of confusion is the myriad of Icons, Tiles and Splash screen sizes needed. Here I thought I would put it all together, in one place, all the image asset details for all 4 platforms iOS, Android, Windows Phone and Windows Store applications.

See also Creating Splash or Launch images for Cross-platform apps with a Photoshop script

Icon and Tile Images

Useful web apps are about for creating some of the necessary icon sizes. http://makeappicon.com/ or http://ticons.fokkezb.nl/ will help with iOS and Android.

However I found that my favourite was Icon Slayer. It is the most configurable and particularly useful for those developing for Windows Phone and App too. You can also add in some additional sizes that are missing in the standard iOS and Android pre-sets. See my Blog for Generating Screenshots and Icons for Xamarin Cross-platform Apps.

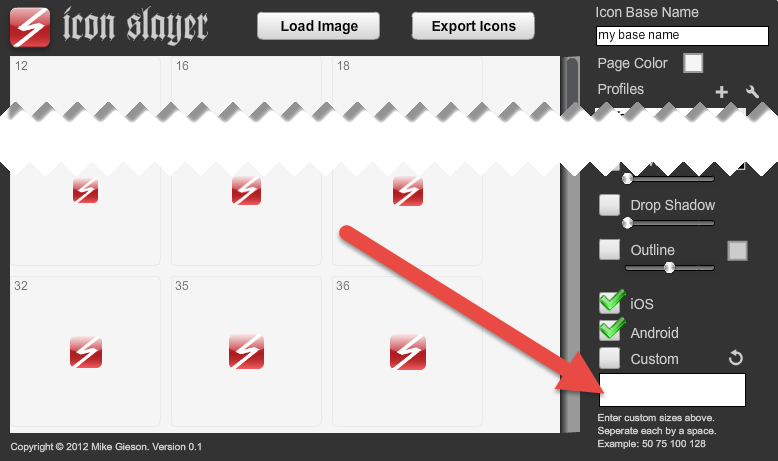
If you tick iOS, Android and Custom, then copy and paste this custom set of sizes (as is, space delimited!),

8 22 70 75 76 80 180 159 110 120 148 150 152 159 173 192 202 300 310 336 358 800

into the ‘Custom’ field in Icon Slayer as shown below, you will produce all the sizes of icons as listed for all platforms below. Icons and Tiles that are do not have an aspect ratio of 1:1 I have highlighted in orange. These will need to be edited by hand, however the images created in Icon Slayer will also cover the width or height of these images too, to help with easy editing later. if you have a transparent or flat background colour, all you will need to do is change the canvas size.

Personally I generate 3 full sets of icons. One set of rounded with effect (use in Android), one set square edged with effect (use in iOS and Windows) and one just plain square with no effect (use for creating other aspect ratio images and sometimes Windows).

Your source Icon or Tile image should be sized to 1024 x 1024 pixels.


iOS Icon Sizes

see Icons and Image Sizes and Xamarin iOS Working with Images and Xamarin iOS Application Icons

When iOS displays an app icon on the Home screen of a device, it automatically applies a mask that rounds the corners. Make sure your icon has 90° corners so it looks good after the mask is applied.

  • Icon Sizes (1:1): 22, 25, 29, 40, 50, 57,  58, 72, 75, 76, 80, 100, 114, 120, 144, 152, 180, 512, 1024

Android Icon Sizes

see Android Iconography

The sizes below include all sizes (including LDPI) for Launcher, Action Bar, Notification, Store and Contextual icons.

  • Icon Sizes (1:1): 8, 12, 16, 24, 32, 36, 48, 64, 72, 96, 128, 144, 192, 512

Windows Phone Tile Sizes

see Tile design guidelines for Windows Phone and App submission requirements

  • Flip Tile Sizes: 159×159, 336×336, 691×336
  • Iconic Tile Icon Sizes (ideal): 70×110, 130×202
  • Iconic Tile Icon Sizes (not ideal): 110×110, 202×202

Windows Store App Tile Sizes

Guidelines for tiles and badges

  • Tile Sizes: 70×70, 150×150, 310×150, 310×310

Splash Screen (Launch Screen) Images

I have not found a useful app for making all your splash screens. So I have created a Photoshop script for doing it. You can find more details about how to get and use in this article here.

iOS Launch Screens

Description Size
iPad Landscape 1024×768
iPad Landscape Retina 2048×1536
iPad Portrait 768×1024
iPad Portrait Retina 1536×2048
iPhone Portrait 320×480
iPhone Portrait Retina 640×960
iPhone Landscape 480×320
iPhone Landscape Retina 960×640
iPhone 5 Portrait Retina 640×1136
iPhone 5 Landscape Retina 1136×640
iPhone 6 Portrait Retina 750×1334
iPhone 6 Landscape Retina 1334×750
iPhone 6 Plus Portrait Retina 1242×2208
iPhone 6 Plus Landscape Retina 2208×1242

Android Launch Screens

On Android launch screens or splash screens are not encouraged and not supported directly in the framework. However Xamarin have added this article on how to bake your own http://developer.xamarin.com/guides/android/user_interface/creating_a_splash_screen/

Due to the very large range of screen sizes found on Android, you are advised to have large bleed areas. The minimum sizes documented for Android are below.

Description Size
xlarge screen landscape 960×720
xlarge screen portrait 720×960
large screen landscape 640×480
large screen portrait 480×640
normal screen landscape 470×320
normal screen portrait 320×470
small screen landscape 426×320
small screen portrait 320×426

Windows Phone Splash Screens

To display a splash screen for all resolutions, use a single image file named SplashScreenImage.jpg that is 768 × 1280. The phone automatically scales the image to the correct size.All splash screen images must be in the root folder of your app project and you must set the Build Action property of the image(s) to Content.

Windows Phone 8 Update 3 will default to using the 720p splash screen file on a 1080p phone.

For a Windows Phone Store app, provide the 2.4x asset at a minimum; preferably all. The image file assets themselves should have a transparent background. In your app manifest, set the value of the SplashScreen@Image property to “Assets.png”, and set a value for VisualElements@BackgroundColor.

see How to create a splash screen fro Windows Phone

Description Size Recommended Filename
Windows Phone 720p Portrait 720×1280 SplashScreenImage.screen-720p.jpg
Windows Phone WXGA Portrait 768×1280 SplashScreenImage.screen-WXGA.jpg
Windows Phone WVGA Portrait 480×800 SplashScreenImage.screen-WVGA.jpg

Windows Store Apps Splash Screens

see Guidelines for splash screens

see Quickstart: Adding a splash screen (XAML)

Use a transparent PNG as your splash screen image for best visual results. Using a transparent PNG lets the background colour you chose show through your splash screen image. Otherwise, if the image has a different background colour, your splash screen may look disjointed and unappealing.

Description Size
1x Splash Screen 620×300
1.4x Splash Screen 868×420
1.8x Splash Screen 1116×540

Other App Store Assets

When finally publishing your app to the store, you may find that additional promotional images are needed. If you have these ahead of time, it can smooth your journey. All stores require screenshots, but I am not going into those here.

iOS Store Assets

  • Spotlight Icons: 29×29, 58×58, 50×50, 100×100, 40×40, 80×80

Android Store Assets

see Graphic assets, screenshots and Video

  • Hi-res graphic: 512×512
  • Feature graphic: 1024×500
  • Promo graphic: 180×120
  • TV Banner: 320×180

Windows Phone Store Assets

  • App Store Icon or Tile Sizes: 300×300, 358×358, 358×173
  • Store Background Image: 100×800

Windows Store Store Assets

** coming soon **

Xamarin Guide Publishing Links

Cool stuff and Tips in Windows 8.1

Many of the new features and enhancement brought in Microsoft Windows 8.1 can easily go unnoticed and unappreciated. Here is a list of new features that I have discovered and think are worthy of a mention and some tips with the functionality. They are not in any particular order, more in the order in which I discover them and or can be arsed to write about them!

I am publishing this now and will update it as new things are discovered, and there are a lot!

NOTE! Some of these things may have been around in previous versions of Windows, but I have only really discovered now!

 Calculator (New)


A little thing, but the new calculator looks great and includes a nice converter too. No need to get another converter app.

The Standard and Scientific options have got the usual options

The converter has almost every options you could want.

 Calendar

This has been improved a touch with the inclusion of a new ‘What’s next’ view and more info cycling on the larger tile.

 Reading List

Reading list is a simple new app that helps you collate things that you want to read later. Maybe like this blog!

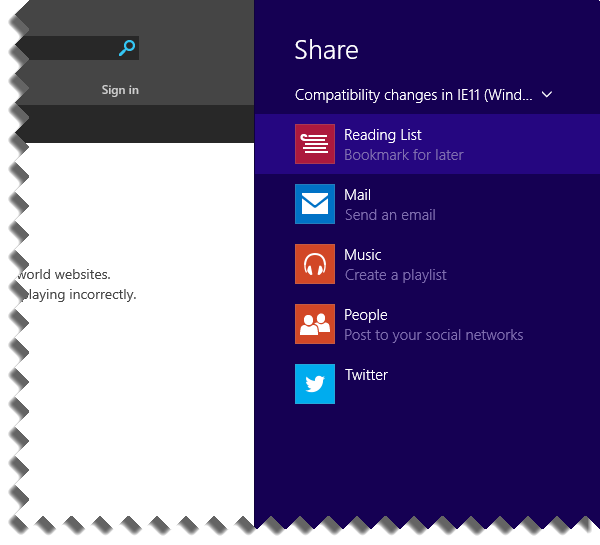
You can simply add items to your reading list from compatible Apps such as Internet Explorer (Touch version only) by using the ‘Share’ charms menu.

From within ‘Reading List’ a click on the listed article opens the appropriate app and pops itself into a slim panel as shown below.

Shortcut Keys

I posted this before, but included here again! Here are few handy Windows Key shortcut keys I find useful

Windows logo key+ D Go to desktop
Windows logo key+ W Search settings only
Windows logo key+ F Search files only
Windows logo key+ C Show the ‘charms’ menu (the one on the right)
Windows logo key+ Tab Switch between recently used apps and programs (left apps bar)
Windows logo key+ L Lock the screen
Windows logo key+ E Opens windows explorer
Windows logo key+ R Open the Run dialog
Windows logo key+ S Opens the Search everywhere. Also do this by pressing the Windows key and just start typing
Windows logo key+ X This opens the ‘Quick Link’ menu. Very useful for the power users out there.
Windows logo key+ SHIFT + (left or right arrow) Move an app or window from one monitor to the other if you have multiple monitor.

For a full list of Windows 8 shortcuts see http://windows.microsoft.com/en-gb/windows-8/keyboard-shortcuts

 Windows Journal

This is an interesting little app that can be very useful. Unless you have the pro version of Adobe Acrobat this app allows you to mark-up, annotate and generally scribble all over any document or thing you can print. When you first start Windows Journal you are asked if you would like to install the printer driver (Journal Note Writer!), say yes. If you didn’t you can do it later from the menus.

Once your doc is there then you can draw and highlight to your hearts content. Unfortunately it does not have a good variety of export or save options. Although you could print to xps or, if you have a pdf printer driver, to that.

You can send by email with these options too (the best being .mht)

 Maths Input Panel

This is for the Maths student or geeks out there. In word or other apps, it can get extremely fiddly writing complex equations.

This is the Word equation toolbar!!!

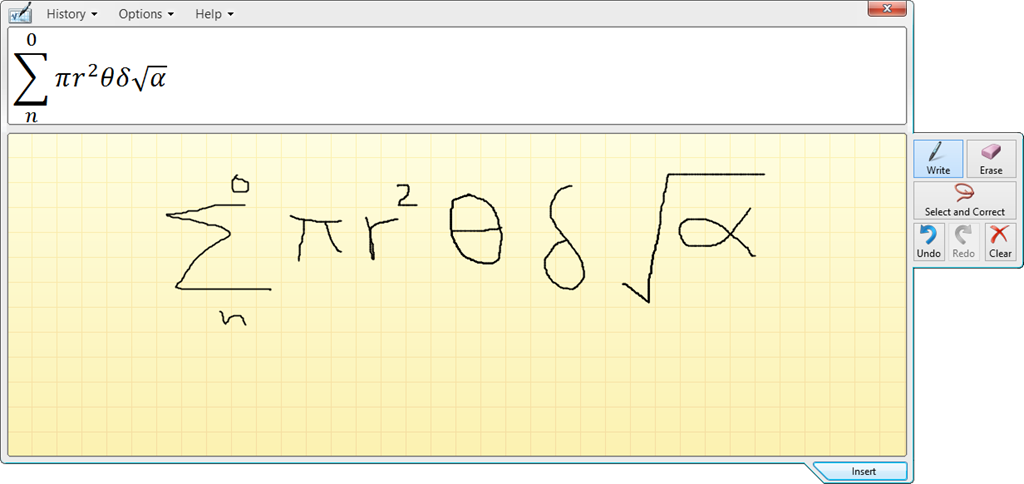
This little app could help you if you have touch screen and just want to try and write your formula and have it work out how to make it pretty and in a way that can insert into your lovely document.

Open the app, write your crazy formula and click insert. It’s recognition is not perfect, but it can help. Note, not all apps can take the output from this app. I have only tried word and Windows Live Writer. Live writer did not understand. The output seems to be the same as the Word Equation writer, so after inserting into word, you can continue with the standard tools.